Tiller Money – also known as Tiller HQ – is a budgeting software unlike any other.
Many budgeting software options exist – Mint and Personal Capital are both excellent, for example.
However, neither of those options are very customizable. So, if you don’t like the way Mint’s App looks, or would like to view your data in a different way than how they normally show it, you’re out of luck.
Tiller Money solves that by importing your data into a spreadsheet instead of a custom App.
If you aren’t comfortable using spreadsheets, you can stick with one of Tiller’s ready-made templates, which are designed to be usable regardless of your prior knowledge.
However, if you ARE comfortable using spreadsheets, you’ll realize very quickly what makes Tiller Money unique, and separates it from its competitors.
Tiller Money price
Tiller Money is not free – it costs $79 per year to use.
In the grand scheme of things, this isn’t a huge deal – with the amount of money Tiller will save you, it should pay itself back many times over in short order.
Plus, since it DOES cost money, you’ll be much more likely to actually USE it. So many people start using something like Mint and then forget about it – that’s less likely in this case.
If you’re still hesitant, you can try it out for a month free – up to a year free if you’re a college student.
Getting started with Tiller Money
Tiller Money was created by CEO Peter Polson in 2014. Tiller’s claim to fame is that Tiller Money is the only service that can sync your daily financial transactions with customizable Google Sheets, allowing much-needed flexibility when analyzing spend.
|
Once you set up Tiller, you can view all your data in customizable or preset spreadsheets, and if you’d like you can receive a daily email summarizing everything that’s happening in your accounts.
Signing up for Tiller Money is extremely simple and quick.
You’ll need a Gmail account if you want to use Tiller Money – if you don’t have one yet, you can create a free one within minutes.
Then, all you need to do is link up your banks and credit cards, and you’re good to go!
In order to connect to your bank accounts, Tiller uses an aggregation partner named Yodlee.
Yodlee is a huge, publicly traded software company that allows Tiller to connect to over 20,000 Banks and Financial institutions. So, you can feel confidant that your bank is supported.
I have a fairly complicated financial setup, and Tiller was able to handle it just fine. Here are all the accounts I connected:
- 1 Chase Bank Account
- 1 Santander Bank Account
- 2 Discover Credit Cards
- 2 Citi Credit Cards
- 3 Chase Credit Cards
- 2 Capital One Credit Cards
- Robinhood Investing Account
- Betterment Investing Account
- Vanguard Investing Account
Tiller Money supported all of them and was able to pull data flawlessly.
In total, it took me under 30 minutes to set everything up – and it would have been faster if I didn’t have so many accounts!
To add an account, just search for the name of the institution within Tiller, and sign in with your online ID.
Some institutions, such as Betterment, have special rules for connecting to third-party apps – in Betterment’s case, you need to create a separate App Password to use instead of your main password.
If this is the case, Tiller Money will give you instructions on how to connect – if you’re still having trouble, contact Tiller or the financial institution and ask what you’re doing wrong.
Using Tiller Money (Google Sheets version)
After connecting all your accounts, you can now set up your spreadsheet.
To do this, log into Tiller Money, click “Create a spreadsheet”, and choose whether you’d like to use Google Sheets or Excel.
Tiller works very similarly on each platform, but there are a few differences – we’ll go over these differences shortly.
The next step is to set up their Add-On so that Tiller can pull information from your financial institutions. Instructions will appear when you open the spreadsheet, so follow them to complete the setup process.
After this, you’re ready to start using Tiller Money! Let’s take a look at all the features available, starting with the Google Sheets version.
Quick Note
I think it’s important to reiterate that Tiller Money does NOT require any knowledge of spreadsheets or formulas – everything is already taken care of for you and laid out in easy-to-understand ways.
However, having some spreadsheet knowledge can allow you to customize your numbers in ways that are not possible with just the standard Tiller Money template.
If you’re comfortable with spreadsheets, feel free to experiment and improve your Tiller Money experience any way you can.
If not, read on and learn how you can get on top of your spending habits with just the default templates already available.

Insights
This page acts as a quick snapshot summary of your account activity.
Here is some of the information you can view on this page:
- Number of transactions
- Largest purchases
- Most frequent places you spent money
- Account Balances
- Net Worth
- Expenses by category (more on how to set up categories soon)
- And more
Basically, this page acts as a simple way to answer the question “How are my finances doing?” without getting too deep into the weeds.
Of course, if you’re using Tiller Money, it’s pretty likely that you DO want to look deeper into your finances than just surface-level summaries – which is what the next sheets are for.
Transactions
This page shows every single transaction you made, from any one of your accounts that are connected to Tiller.
Most of this page is straightforward – there is a row for every transaction you made, and columns for the following categories:
- Date
- Description
- Category
- Amount
- Account
- Account #
- Institution
- Description
There are a few other columns as well, but the above columns are the ones you’ll be paying attention to.
Recently, I deposited money into Betterment, which then took that money and used it to buy 6 different funds. Here is how those transactions are displayed in the transactions tab:

All the columns except “Category” are pulled automatically from your financial institutions, so no work will need to be done on your part.
The Category column is used for budgeting purposes – Tiller allows you to make budgets for specific categories and compares your actual spend in each category vs that category’s budget.
However, in order for Tiller Money to calculate your spending in each category, it needs to know what category each transaction falls in.
There are 2 ways to choose categories for your transactions.
The first way is to manually select a category from the dropdown in the “Category” column for each transaction, and the second way is to automate the process using Autocat.
Autocat
Autocat is a system Tiller Money uses to let you make rules regarding which transactions belong to which category.
To use Autocat, click the Autocat button on the Tiller Money sidebar (to launch the sidebar, click “Add-Ons”, “Tiller Money Feeds”, then either “Launch” or “Open Sidebar” depending on which of those options appears).
From there, you can Install Autocat, which creates a new tab in the Google Sheet. Fittingly, this sheet will be named “Autocat”.
Then, go back to the sidebar select whether you want Autocat to run automatically, or whether you want to manually choose when to run it.
Creating Rules with Autocat
With Autocat, you can make rules based on 3 of the columns mentioned above:
- Institution
- Account
- Description
For example, in my situation, any transaction that is made by Betterment is always going to be an investment purchase as opposed to paying a bill, since Betterment is an investment account.
So, I can make a rule saying that any transaction from the Institution of Betterment should be put into the “Investment” category:
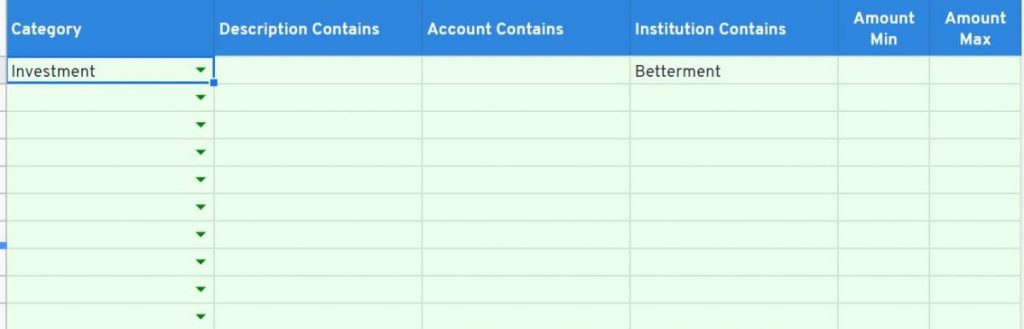
(Note: if you’re following along, you may notice that “Investment” isn’t actually a default category. In the next section, we’ll go over how to make your own custom categories, and set up budgets for them as well).
After making this rule, you can set Autocat to run manually so you can see the result.
Let’s check back on our transactions page and see what happened:

Look at that! All 6 Betterment transactions had their category filled in by making a single Autocat rule.
Using my situation again, I have 2 credit cards from Capital One: A Capital one Journey card, and a Capital One Spark Business Card. The Journey card is only used to pay for my Youtube Premium account. I would like to categorize this expense in the “Subscription” category.
However, I can’t make a rule saying that any transaction from the Institution of Capital One should be a “Subscription” since I have a second Capital One credit card that I use for other purchases.
So, instead, I can make an Account-based rule, and say that any transaction from an account that contains the word Journey will be categorized as a Subscription:
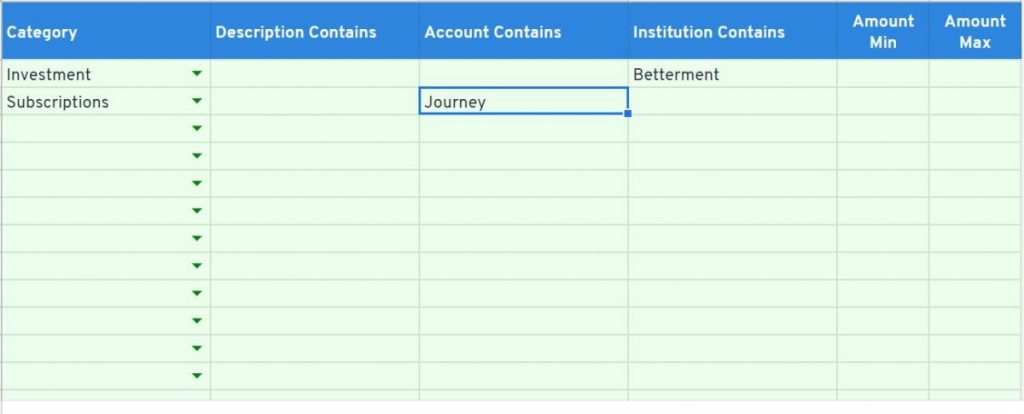
Similar to the first example, all transactions made with the Journey card will be labeled as “Subscriptions”.
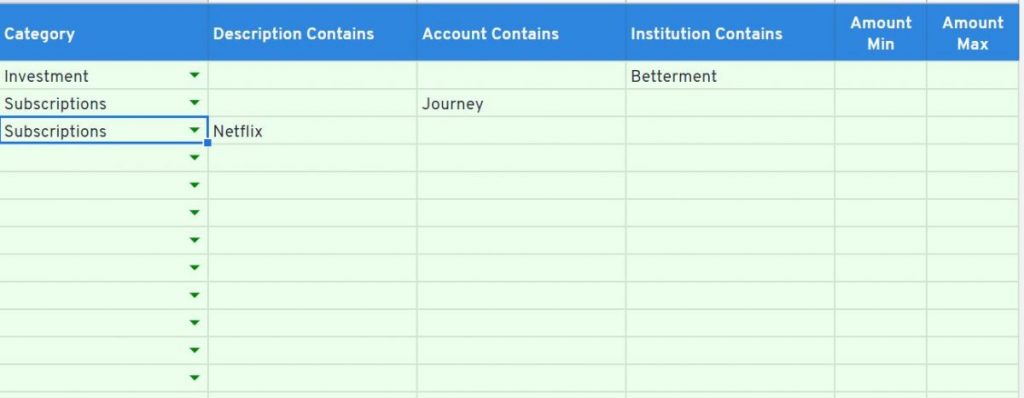
For most people, the most useful way to use Autocat will be to make rules based on Description.
For example, you can use this feature to make any transaction with the name of your favorite fast food joint go into the “Fast Food” category, or as I did, make any transaction with the word “Netflix” go into the “Subscription” category:
At the end of each month, you should go over all your transactions and see which ones were not automatically put into a category.
Then, instead of manually putting in a category for that transaction, make an Autocat rule that will ensure any future transactions of that type will be put into the correct category automatically.
At first, you’ll have to create a lot of Autocat rules, but after a couple of months, you’ll have an Autocat rule set up for almost every transaction you make, significantly decreasing the amount of work you’ll have to do.
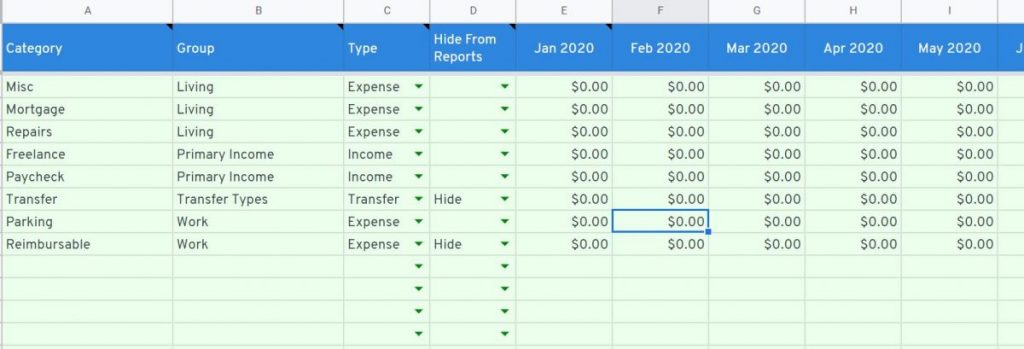
Categories
Remember how I used the “Investment” category in the previous section, but that category didn’t actually exist?
This page is where I was able to create that category and all other additional categories.
This sheet has a row for every category, and the following columns:
- Category name
- Category Group (more on this later)
- Type
- Hide from Reports (yes or no)
- Columns for each month of the year
For example, one of the default budget categories in Tiller Money is “Parking”, which is placed in the “Work” group.
This category is labeled as an Expense in the Type column – in this column, you can choose whether this category consists of Expenses, Income, or Transfers.
Certain categories – for example, transfers from one bank account to another – you might want to hide from your budgets, as they may not be “True” expenses. So, in the “Hide from Reports” column, you can select either “Yes” or “No” from the dropdown.
Then, enter a monthly budget into the “January” column, and that will be your monthly budget moving forward. If your budget is different depending on the month, you can manually change the budget amount for each month as well.
Tiller Money starts off by listing some default categories, but it’s simple to add more – just scroll down to the first blank row and start filling out each column:
- Create a category name
- place your new category into one of the existing groups, or create a new group
- Choose the type
- Choose whether to hide this category from budgets
- Enter your monthly budget into the “January” column.
Here, see how I added a category called “Investment”:
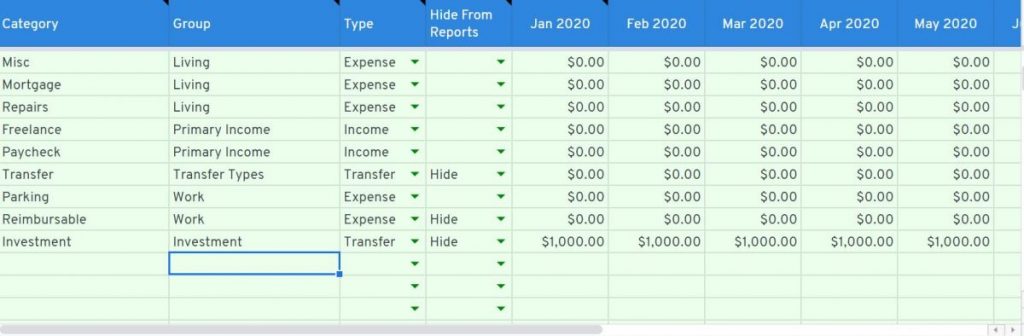
First I named the Category “Investment” and then I put it in a group that’s also called “Investment” (although the group name could have been anything).
I also labeled it as a transfer, selected the option to hide this category from the budget, and entered a sample budget number in the January column – as you can see, that budget number was automatically used for the following months as well.
And that’s it – your new category now exists, can be selected as one of the Category options in the Transactions page, and can be used to make rules with Autocat.
Existing categories – even the default ones – can also be edited. For example. if you would like to group some of the categories differently, just change the value in the “Group” column, and the group will be updated throughout the spreadsheet.
Monthly Budget/Yearly Budget
All the work that you’ve done to set up the categories correctly finally comes into play on these next 2 sheets.
The monthly budget sheet will display your actual expenses vs your budget in each category, showing you how you’re doing compared to your spending goals.
At the top of the page, you’ll see a message indicating how many transactions are uncategorized – for accurate results, make sure to categorize all transactions first.
You’ll also see a cell where you can select the month and year, so you can easily view your spending vs budget for any month you wish.
Below, you’ll see your budgets broken down first by Group, then by category.
For example, you’ll see all your discretionary spend vs your total discretionary budget, PLUS you can drill down further and see the information for each individual category you placed into the “Discretionary” group.
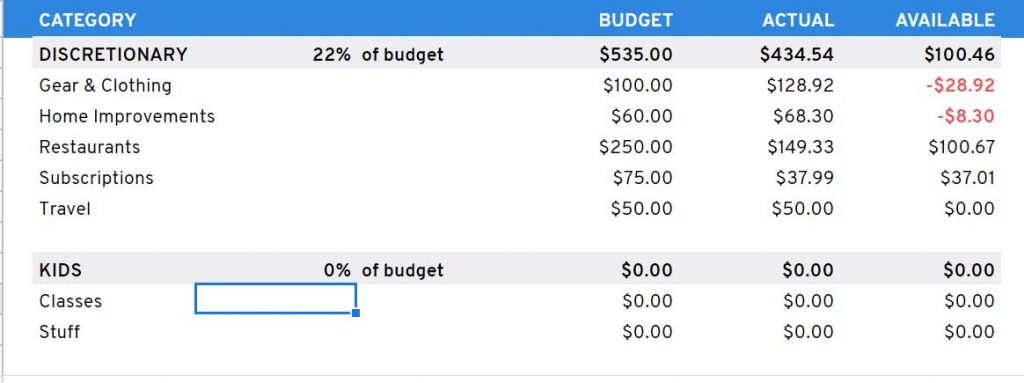
In the above example, $535 is budgeted for Discretionary expenses each month, which is 22% of the total budget.
Each category within the Discretionary group has its own budget as well.
The actual spending for each of these categories is then compared to the budget so that you can determine which areas you’re struggling to hit the budget for.
In the above example, discretionary expenses as a whole are below budget by a bit over $100.
However, 2 categories within the discretionary group – Gear & Clothing and Home Improvements – are ABOVE budget. So, focusing on these 2 categories could represent an opportunity to cut spending.
For a yearly roll-up, check out the “Yearly Budget” page. This sheet will show you how you’ve done year to date in each of your budget categories/groups.
This is also helpful if you’d like to see trends, such as:
- Are your expenses getting closer to budget each month?
- Is spend increasing each month?
- Which spend categories have I been getting sloppy with lately?
All of these questions, and more, can easily be answered within the “Yearly Budget” page.
Balances
This next page takes a break from showing your budgets and provides a nice snapshot of your current New Worth.
Think of this as your own personal Balance Sheet.
All your Assets – including cash, investment accounts, and any manual property type assets you’ve entered – will be broken down by account, totaled up, and compared against your liabilities/debt (also broken down by account). This information is then used to calculate your Net Worth.
Tiller Money for Excel
The Excel version of Tiller Money is still in Beta, so be prepared for small errors and changes along the way.
In general, using the Excel version is pretty similar to the Google Sheets version, so all that matters is which service you prefer – sheets or Excel.
To use Tiller with Excel, download the template, then follow the instructions on the Get Started page to download the Tiller Add-in.
The Transactions, Categories, and Balances sheets work exactly the same as they did in the Google Sheets version, and the Budget sheet works the same as the Yearly Budget sheet – at the moment, there is no Monthly Budget sheet in the Excel version.
Instead, they have a “Tracker” page – this page shows spend vs budget information for any selected time period. So in practice, you can use this page how you would the Monthly Budget page, with the added feature of being able to filter by any time period you’d like.
The biggest negative of using the Excel version is that Autocat isn’t yet available, so you’ll have to manually enter the categories for each transaction every month. Keep this in mind when choosing to use the Excel version.
Tiller Labs
Tiller Money supports a community of spreadsheet experts who are constantly experimenting with ways to make Tiller Money even better.
Many of them create additional templates or add ons to the standard Tiller experience.
They are completely optional, but if you have some spreadsheet skills, you might want to check out what they’re working on, and maybe use some of the template additions for yourself.
Is Tiller Money safe?
The short answer? Yes, Tiller Money is safe.
The long answer?
Your data is encrypted using 256-bit AES encryption. This is an extremely secure form of encryption and makes it almost impossible for hackers to steal your data.
Additional safety features such as two-factor authentication are also supported.
Bottom Line: Tiller Money Review
Tiller Money succeeds in showing your data in clear and concise ways, while also allowing more advanced users to customize their experience and tailor their Tiller Money spreadsheet to meet their requirements.
In my opinion, no other service comes close to providing what Tiller Money provides.
Tiller isn’t for everyone. If you aren’t so comfortable with spreadsheets and would rather not pay a small fee, you may decide to use a competitor like Mint.
There’s absolutely nothing wrong with that – Mint, Personal Capital, YNAB, and many others all do a perfectly serviceable job.
However, if you want to take your spending and budget analysis to the next level, there’s no better way to do that than with Tiller Money.
Max Kimmel
Max Kimmel graduated Summa Cum Laude with a B.S in Mathematics and Minors in Finance and Information Technology. He is a data expert and uses these skills to make sure all facts mentioned in his articles are accurate. Max has grown multiple e-commerce businesses to 6 figures in sales, invests in Index Funds, Rental Properties, and Cryptocurrency, and has been featured by HuffPost and Forbes.
